Adapting Pronunciation Activities for Remote Classrooms
by Marla Tritch Yoshida

In the past year, more and more language teaching has
moved from face-to-face interaction to online learning. Teachers are also
finding ways to adapt their favorite pronunciation practice activities to fit
this new mode of teaching. Chances are that even when we’re able to return to
our physical classrooms, online teaching will continue to be a bigger part of
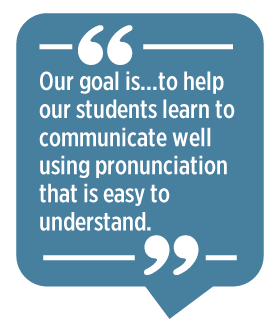
many teachers’ lives than ever before. In both face-to-face and remote
pronunciation teaching, our goal is the same: to help our students learn to
communicate well using pronunciation that is easy for listeners to understand.
I’d like to talk about a few activities that work well in the classroom but can
also be easily translated into an online class.
Most of us
who teach online with synchronous class meetings use two main types of tools: a
videoconferencing system such as Zoom
or Google
Meet and a learning management system (LMS) such as Canvas, Moodle, Blackboard,
or Google
Classroom. By using the capabilities of these, plus a few other
carefully chosen tools, we can adapt many activities to remote teaching for
meaningful pronunciation practice. In the following suggestions, I’ll refer to
Zoom and Canvas because those are the tools I’m most familiar with.
 Google Tools for Guided Practice
Google
offers a range of tools that are free, simple to use, and valuable in creating
teaching activities, in particular, Google
Slides and Jamboard.
Google Slides, like Microsoft PowerPoint, can be used to create a series of
slides that are stored online and can be viewed and edited by anyone who
receives permission from the creator of the slides. Jamboard is an interactive
whiteboard tool that also allows multiple users to share and edit a document.
The functions of these two tools are similar, and most activities can be
duplicated in either one. However, Jamboard’s controls are much simpler than
those of Google Slides and might be less confusing for students. Also, Jamboard
documents are not limited to a standard “slide” size and horizontal
orientation, as Google Slides are. Some examples of activities using these two
tools follow. You can see working examples of the following three activities at this
link.
Information
Gaps
Information
gaps are useful for practicing pronunciation in a meaningful way if the words
needed to complete the activity include sounds or other pronunciation features
that we want to practice. In a classroom, we might give each student in a pair
a handout with partial information; by talking together, the partners
reconstruct all the information while practicing pronunciation. Similar
activities can be made using Google Slides.
Here’s one
way to do it: Create a table, picture, or list as you normally would for an
info gap. Copy the same information onto two slides in the same deck, one
labeled “Partner A” and one labeled “Partner B.” Remove some information from
each slide so neither partner has all the information. Add a slide at the
beginning of the deck giving instructions. (See Figure 1). If you have students
use the activity in breakout rooms, duplicate the slide deck so there is a copy
for each planned pair. Finally, copy the sharing links to each pair’s slide
deck and post them on your LMS or paste them into the chat box on Zoom. Label
each copy “Pair 1,” “Pair 2,” and so forth so students will know which links to
click for their own breakout room. To ensure that students are able to do the
activity, make sure the sharing permissions allow anyone with the link to edit
the slides.

Figure 1. Information gap example using Google
Slides.
To play, put
students in pairs in breakout rooms. Students in each pair click the link to
the slide deck for their group and then find the slide labeled “Partner A” or
“Partner B.” The partners follow the instructions to discover the missing information
and type it in on their own slide. In all these activities using Google Slides,
students need to keep the slides in “Edit” mode, not “Present” mode, or no one
will be able to move objects on the slide.
Sorting
Activities
Google
Slides can also be used for sorting activities, such as grouping words with the
same syllable patterns or words with the same vowel sound. On a Google Slide,
make boxes or labels for each of your categories. Make a series of smaller text
boxes, each containing one of the words to be sorted. If you change the
background color of the boxes, they’ll be easier to see. For a whole-class
activity, put a link to the slide on the LMS or Zoom chat box. Students click
on the link, then work together to drag the text boxes to the correct category.
For small-group work in breakout rooms, duplicate the slide and give each group
a link to its own copy.
Visual
Modeling
Google
Slides can also be used to let students build visual models of the syllable and
stress patterns of words. On the left side of a slide, draw several large and
small shapes to represent stressed and unstressed syllables. It’s helpful to
make the stressed syllables a colorful, interesting shape and the unstressed
syllables smaller and plainer, to emphasize that stressed syllables are louder,
longer, and clearer than unstressed syllables. On the right, add a text box
with a word in large letters. By dragging some of the shapes and placing them
above the written word, students can make a model of the number of syllables in
the word and its stress pattern. (See Figure 2.)
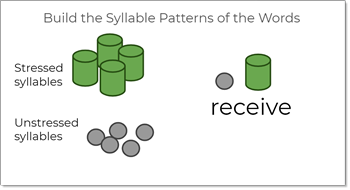
Figure 2. Visual modeling example using Google
Slides.
Virtual “Board”
Games
Activities
similar to these can be made using Jamboard. You can see an example of a
pronunciation review board game made with Jamboard at this
link. I used the “set background” option to upload an image of a
simple game board, then drew small circles, squares, and other shapes to be
used as game tokens. These are moveable and can be dragged around on the board
by players. I typed review questions on “sticky notes” on Jamboard and
“stacked” them on top of each other to one side of the game board. (See Figure
3.)
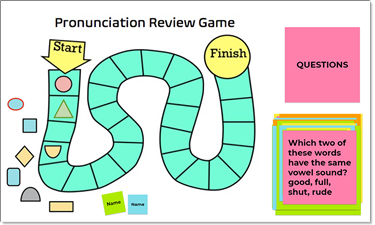
Figure 3. Virtual “board” game example using Google
Jamboard.
To play,
each student clicks a link to the game. Because Jamboard is an interactive
whiteboard, all the students can take turns playing together and see the
results of their own and other students’ moves. Students take turns to play.
The first student “rolls the dice” to get a number, chooses a question by
dragging the top question card away to reveal a new question, and answers the
question. If the answer is correct—and with the help of classmates, it usually
is—the student moves that number of spaces. There’s a simple homemade
number chooser on Google Drive, or you can find other “virtual dice”
online. As an alternative, students can roll actual dice on their own or flip a
coin to choose a number. Students continue to take turns until someone reaches
the “finish” space. This type of board game can also be used for conversation
practice, grammar or vocabulary review, or many other topics by changing the
question cards.
Tools for Recording Pronunciation Practice
Online
teaching also offers many ways for students to record their pronunciation or
speaking practice and share their recordings with the teacher and students
through the LMS. In choosing a tool to do this, here are some considerations to
keep in mind:
-
Keep it simple to avoid
student confusion. To lessen the learning curve, limit the number of tools you
use and try to get the most out of each one.
-
Aim for tools that work on
both computers and mobile devices and are available for all operating
systems.
-
Choose free tools whenever
possible. Tools that you already have are even better.
Here are
some recording tools to consider, in addition to the voice recorders and video
recording capabilities included with cell phones, tablets, or computer
operating systems:
-
Discussion boards on Canvas
or another LMS offer simple recording tools. In response to a discussion
prompt, students can record video or audio directly onto Canvas. They can also
record on a phone or other device and upload the recording to the discussion
board.
-
Flipgrid
is a free website that offers a simple way for students to record videos in
response to a topic, optionally adding frames, emojis, or photos. Students can
see each other’s videos and leave recorded or written responses.
-
Thinglink,
which offers both free and paid versions, lets users upload an image, video, or
360° image, insert interactive “tags” at chosen spots, and attach spoken or
written comments, photos, or videos to those spots on the image. When users
click on the tags, they hear or read the comments.
-
Narration can be recorded
on Microsoft
PowerPoint or Apple
Keynote slides, and these can be exported as videos. This is a good
way for students to create their own illustrated and narrated stories. Google
Slides doesn’t allow recording directly on slides, but you can record on
another device and upload the recording to a slide.
-
Vocaroo
is a very basic, free tool for recording sound, though it doesn’t offer a way
to collect students’ recordings. Its features are limited, but it’s virtually
foolproof.
Conclusion
Practicing
pronunciation online can present challenges, and it requires different ways of
looking at the kinds of activities we might normally use in a classroom. Still,
with a little ingenuity, many of our favorite activities can be translated to
remote teaching. We might even discover that we want to continue using some of
these tools in our future face-to-face classrooms!
NOTE: A version of this
article first appeared in the March 2021 issue of TESOL’s Speech,
Pronunciation, and Listening Interest Section newsletter, As
We Speak.
Marla
Tritch Yoshida, MA in linguistics, is an
ESL and TEFL instructor at the University of California, Irvine Division of
Continuing Education. She has taught ESL for more than 30 years in the United
States and Japan and has done teacher training in the United States, Japan, and
Korea. She is the author of Beyond
Repeat After Me: Teaching Pronunciation to English Learners
from TESOL Press.


 Welcome to another edition of the TESOL Games and Learning Blog! Last month we explored Twine, a text-based interface for creating interactive stories. Twine is a great tool for older students or more advanced language learners, but perhaps not the best choice for younger learners. Younger learners can still engage in the creative process of making games by using Scratch—a visual programming language for making games and animation.